1月2日、「mScopePal」のバージョン2.0を提出しました。審査に通り次第、配信されます。 →リリースされました。
iPhone / iPod touch 上で動作します。要 iOS 12.0以上。バックカメラのみサポートしています。
★顕微鏡撮影グレンデルさんのサイトにて【スマホ撮影でここまでできる!】と題し、私のブログ「エビ水槽のチビたん」とmScopePalをご紹介いただきました!★
ありがとうございますm(__)m
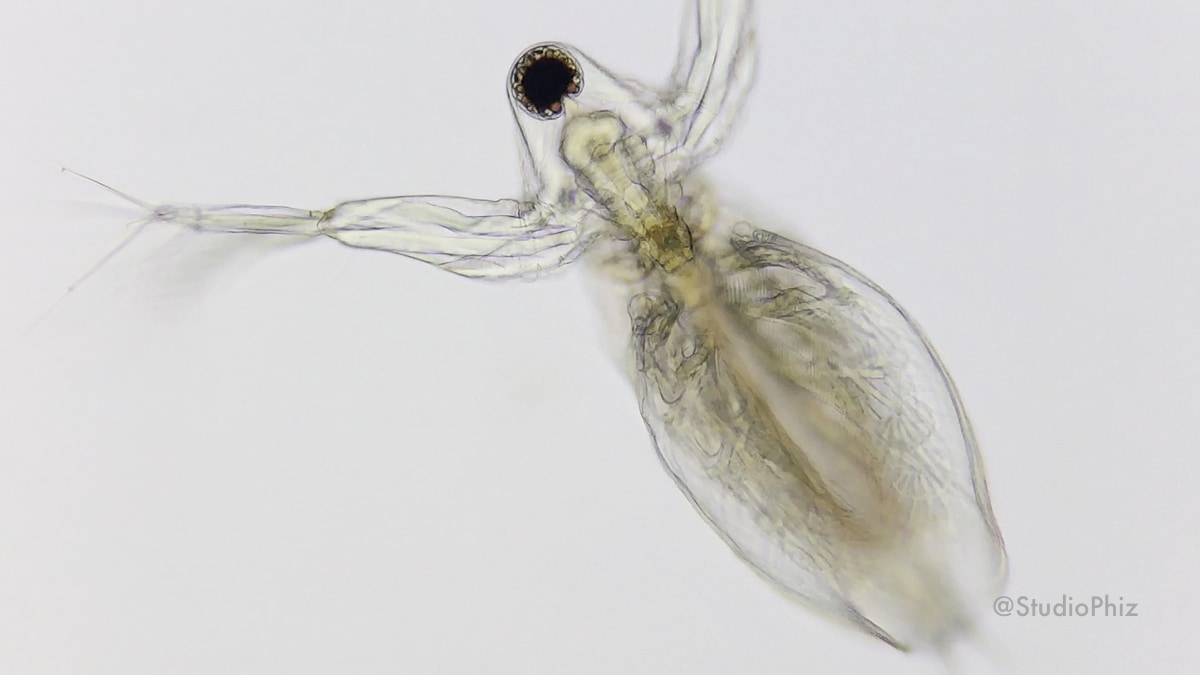
*私がこれまでに撮影した顕微鏡写真/動画は、ブログ「エビ水槽のチビたん」にてご覧いただけます。最近の画像はすべてmScopePalを使って撮影しています。 App Store上のスクリーンショットも、実際にmScopePalを使って撮影したものです。
mScopePal v2.0: ENGLISH Description
![]()
App Storeの説明文:
mScopePalは、顕微鏡撮影に特化したカメラアプリです。
ホワイトバランス(色)や露出(明るさ)の調整が簡単にでき、ズームもデバイスの最大倍率までOK。
フォーカスはマニュアルなので、顕微鏡のピントとバッティングしません。
(市販のアダプターなどでiPhone/iPod touchを顕微鏡に取り付けてご利用ください)
このバージョンの最新情報
- 撮影モードやMWB/MF値が記憶できるようになりました。
- ホワイトバランス調整で、デバイスの向きに関わらず座標/スライダーが共に利用できるようになりました。
- ステップ調整機能(WB / EV / MF / UIカラー)
- プリセット登録機能(WB / MF / UIカラー)
- 指定したフォーマットで撮影できない不具合を修正しました。
- iOS 13でリモートシャッターが機能しない不具合を修正しました。
v2.0より、アプリ終了時に撮影モードとMWB/MF値が保存されます。次回は同じ撮影モードで起動し、MWB(マニュアルホワイトバランス)の場合は値が復元されます。MF(マニュアルフォーカス)値も復元されます。
またステップ調整・プリセット登録など、スライダー周りの機能を強化しました。
ホワイトバランスと露出の設定画面が別れたため、「ライティング設定」画面はなくなり、「リセットボタン」も廃止しました。
*露出オート、EV:0、AWBで前バージョンまでの「リセット」状態となります。
なお、回転ロックの挙動も一部変更していますのでご注意ください。
UIや機能を一新していますので、改めて全体の使い方を説明します。
初めての方へ:iPhoneが顕微鏡になるアプリではありません。iPhoneを顕微鏡に取り付けて撮影するためのアプリです。また、顕微鏡側のピントを生かすため、オートフォーカス機能はありません。
*典型的なシチュエーションでの色調補正操作を解説した「mScopePalでスマホ顕微鏡撮影を楽しもう!」もぜひご覧ください。
*アプリのご利用前にmScopePalのプライバシーポリシーをご一読ください。
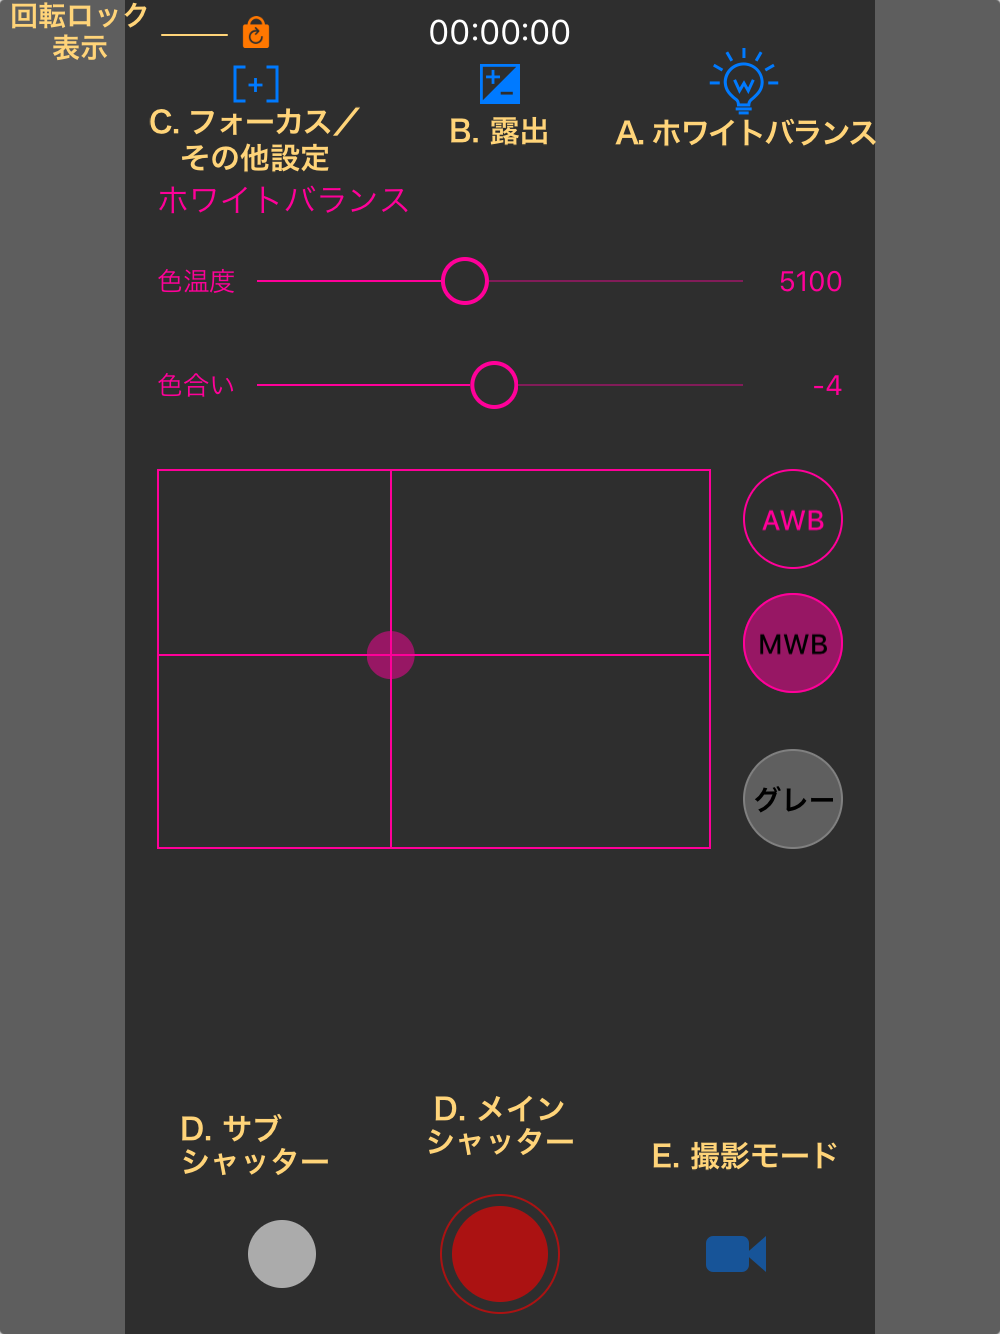
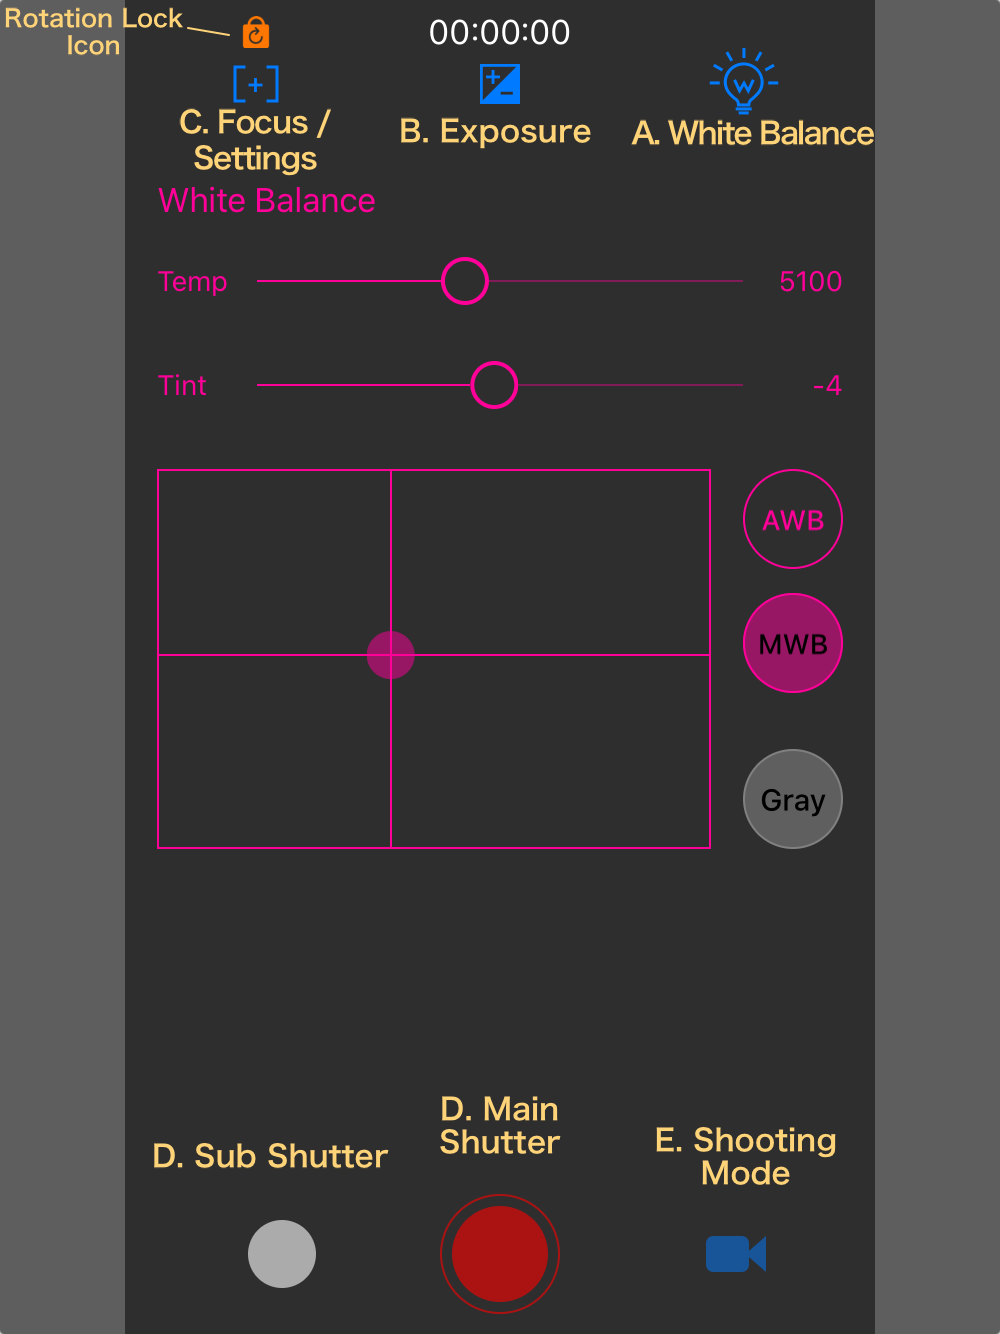
A: ホワイトバランス(WB)設定
1. WBモード
オート(AWB)とマニュアル(MWB)の2モードが利用可能です。
2. MWB調整
MWBモードでは、スライダーと座標でホワイトバランス調整が可能です。
色温度と色合いのスライダーでは通常の操作のほか、ステップ調整/プリセット登録が利用できます。
座標では、横軸を色温度、縦軸を色合いとして、WBを表示します。
MWBモードでは色温度と色合いを指一本で直感的に操作できます。MWBに切り替えると軸の交点に丸いポインターが出ますので、画面の色合いを見ながらドラッグしてください。
*色温度では青〜黄色を、色合い(ティント・色偏差とも言います)では緑〜マゼンタの色味を調整します。
3. グレーロック
デジタルカメラでは色を正確に撮りたい時にグレーカードを使いますが、グレーロックはそれに当たる機能です。 照明に色被りがある場合や、プレパラートの封入材に色がある時などに有効です。
明視野で視界内に被写体を含まない(照明光のみの)状態にして、グレーボタンを押してください。 自動的に適切なWBに調整されます(AWBの場合はMWBに移行します)。
厳密には、対物レンズを変えるごとに調整し直すのが良いのですが、頻繁にレンズを変える場合はメインの対物レンズで合わせておくだけでも色の正確性を改善できます。
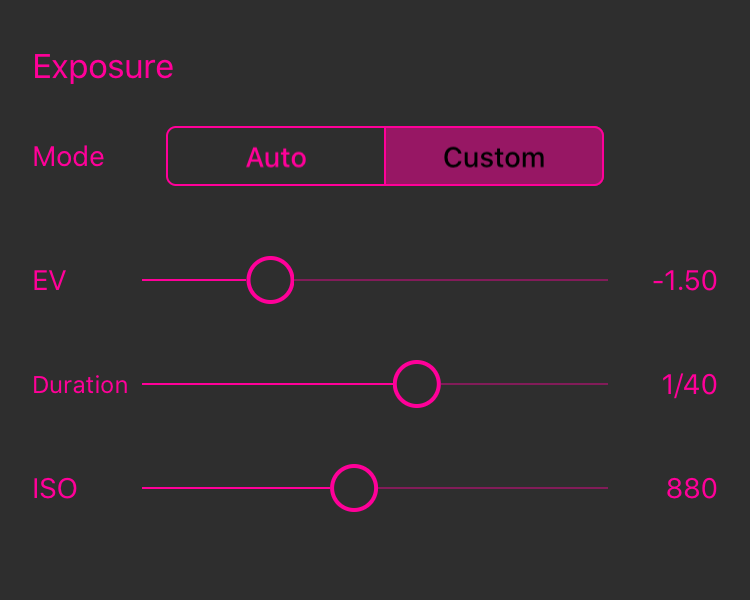
B: 露出設定
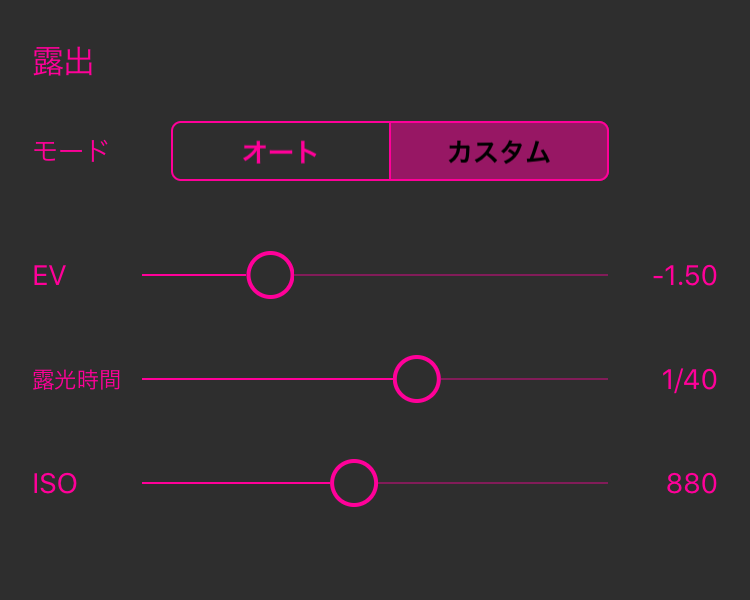
1. 露出モード
露出はオートとカスタムの2モードが利用可能です。
2. EV(露出補正)
露出モードに関わらず使用できます。
明視野観察では0かプラス側、暗視野ではマイナス側に振るのが基本です。特に暗視野の時はEVを下げることでノイズを減らす効果もあります(顕微鏡の照度を少し上げておくと良い)。
スライダーでは通常の操作のほか、ステップ調整が利用でき、左端のラベルをロングプレス(長押し)すると、デフォルト値の0に戻ります。
*EVスライダーではプリセット登録はできません。
3. 露光時間、ISO
露光時間とISOは、露出モードがカスタムの時のみ使用できます。
代表的な使用シーンとしては、暗視野での静物写真撮影が考えられます。オートでは画面が暗くなるとどうしてもISOが上がってしまい、ノイズが多く出ます。このような時にはISOを下げ、露光時間を少し伸ばして必要な明るさを確保するようにすると、ノイズの少ない写真が撮れます。
ただし、強制的に露光時間を長くすると、カメラの反応は鈍くなります。モニターへの画像反映が遅くなり、動画を撮るとカクカクになりますので、静物写真のみに推奨の方法です。
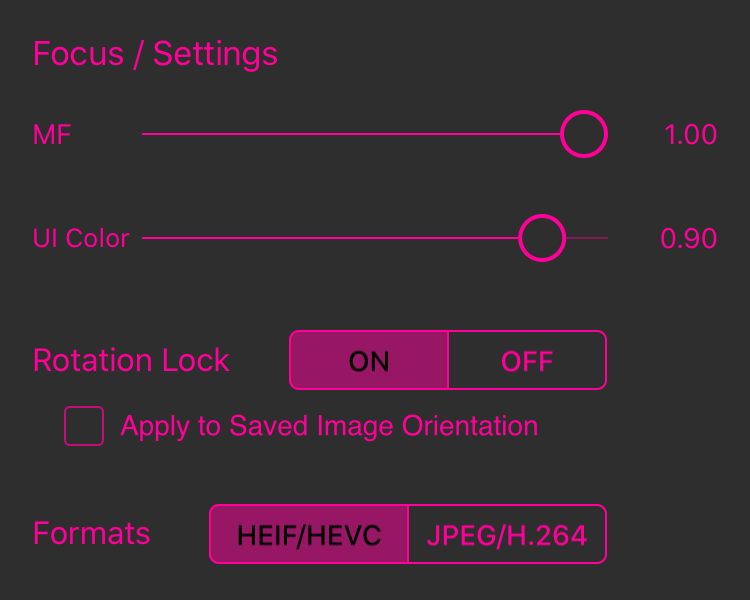
C: フォーカス / その他設定
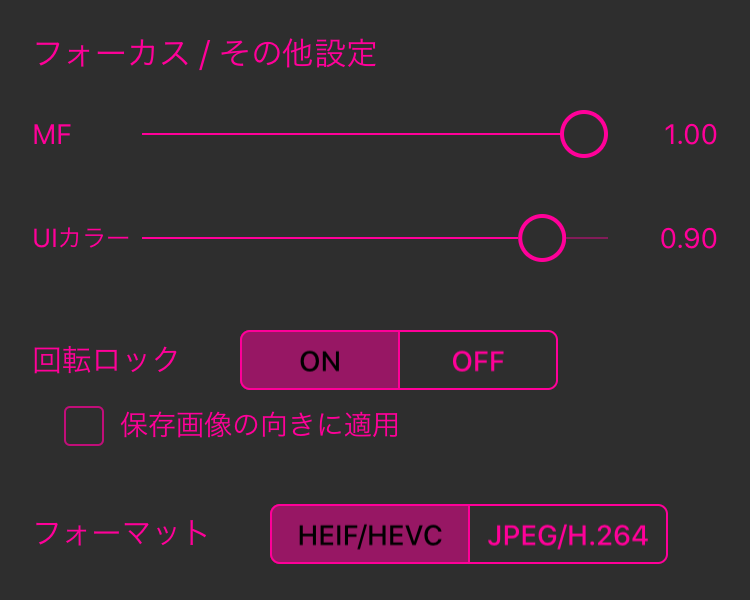
1. MF
初期値は最遠側1.0です。顕微鏡撮影であればこの状態での使用をお勧めしますが、状況に応じて調整可能です。
スライダーでは通常の操作のほか、ステップ調整/プリセット登録が利用できます。
2. UIカラー
設定画面のUIのカラーは濃いピンク(0.9)が初期値ですが、見辛い場合は変更できます。
スライダーでは通常の操作のほか、ステップ調整/プリセット登録が利用できます。
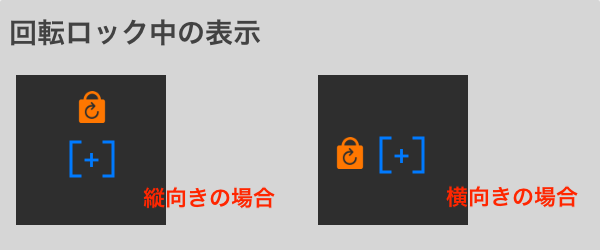
3. 回転ロック(一部変更点あり)
回転ロックを使うと、デバイスが縦向きの状態でも、横向きでミラーリング出力したり、画像を横向きに保存したりできます(縦横逆も可)。
*この機能を使用しない場合は、スイッチOFFで無効化できます。
操作方法:設定画面が出ていない状態で、デバイスをロックしたい向きにし画面をダブルタップします(確認ダイアログあり)。ロックがかかると[+]アイコンの側にカギアイコンが表示されます。
解除するには、デバイスをロックした向きに戻し、ダブルタップします(確認ダイアログは出ません)。
*誤動作防止のため、ロックした向きからでないと解除できないようになっています。
回転ロックはアプリを閉じて30秒経過すると、自動解除されます。
【注意】回転ロックは、デバイスが平らに置かれた状態ではロックも解除もできません。必ず縦向きか横向き(短辺か長辺の一方が上になる状態)で操作を行ってください。
*ロック中の保存画像の向きについて:デフォルトでは、回転ロックしても撮影画像はデバイスの向きに応じて保存されますが、設定を変更すると、ロック中の向きで画像保存することができます。
(横向きでロックするとデバイスが縦向きでも横画像として保存できる)
「フォーカス / その他の設定」画面で「回転ロック」の「保存画像の向きに適用」にチェックを入れてください。
*この設定はアプリの終了後も保存されます。ただし回転ロックを無効化するとリセットされます。
4. フォーマット
HEIF/HEVCフォーマットが利用できる機種で表示され、画像の保存フォーマットを指定できます。
デフォルト値は、HEIF/HEVCです。iOS標準のカメラアプリの「高効率」に相当します(同等の画質でファイルサイズがかなり小さくなります)。
「互換性優先」に変更したい場合は、JPEG/H.264を選択してください。
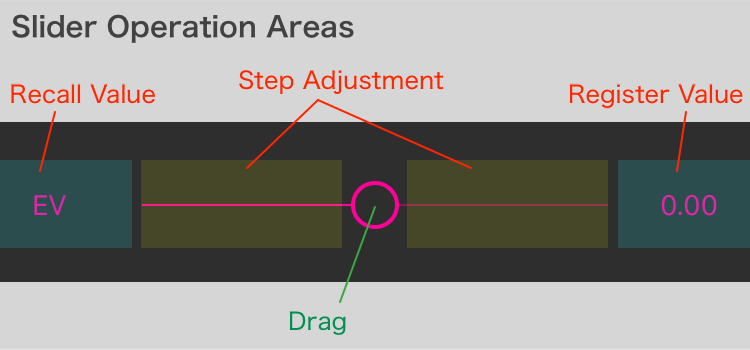
new!ステップ調整機能
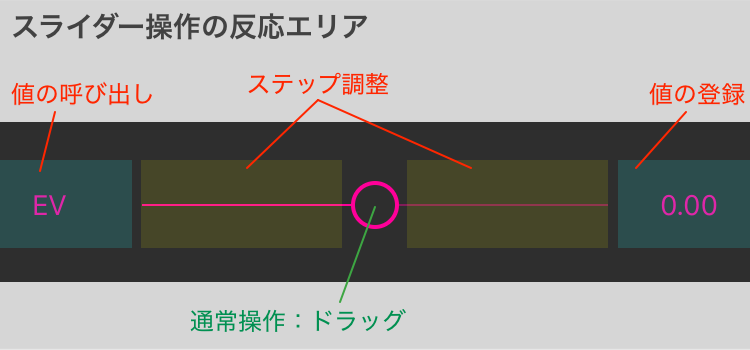
一部のスライダーでは、ハンドル左右いずれかのバー部分に指を置き、上向き/下向きにフリック(素早く払う)操作を行うことで、一定の刻み(ステップ)幅で数値を増減できます。
利用できるスライダーとステップ幅は以下の通りです。
- 色温度: 100
- 色合い: 5
- EV: 0.25
- MF: 0.1
- UIカラー: 0.1
new!プリセット登録・呼び出し機能
一部のスライダーには、後で呼び出したい値(プリセット)を一つ登録することができます。
スライダー右側のラベル上でロングプレス(長押し)すると現在の値を登録、左側のラベル上でロングプレスすると値の呼び出し(セット)となります。
(登録・呼び出し共に確認ダイアログが出ます)
利用可能なスライダー:
- 色温度
- 色合い
- MF
- UIカラー
*EVはデフォルト値(0)の呼び出しのみで、プリセット登録はできません。
D. 撮影ボタン(メインシャッター/サブシャッター)
動画モードの時は、メインシャッターの他に写真撮影用のサブシャッターが表示されます。
E. 撮影モード
タップで撮影モードチェンジ。写真モードの時はスチルカメラ、動画モードの時はムービーカメラアイコンに変わります。
ズームについて
ピンチジェスチャー(画面上の2本指の幅を広げる/縮める)によるズームをサポートしています。
デバイスの最大倍率まで拡大可能ですので、ピント合わせやトリミングに便利です(拡大しすぎると撮影画像が荒くなりますのでご注意ください)。
各種設定画面を出したままでもズームできます。
リモートシャッター
イヤフォンの中央ボタンで、メインシャッターを操作できます。
*Apple製のイヤフォンにて動作確認済み。他社製の場合は機能しない可能性があります。
*iOS標準のカメラとは異なり、ボリュームボタンでの操作はできません。
mScopePal is a camera app specialized for microscopic shooting.
Easy adjustment of brightness (EV) and color (White Balance). Zooming supported.
The manual focus function does not disturb the focus of the microscope.
(Run the app on iPhone or iPod touch attached to a microscope using an available adapter etc.)
* Front camera is not supported.
Caution: mScopePal doesn't turn your iPhone into a microscope. There is no autofocus function to utilize the focus of the attached microscope.
Requires iOS 12.0 or later.
What's New in This Version
- You can now save the shooting mode and MWB/MF value.
- Coordinates/sliders are available for white balance adjustment regardless of the orientation of the device.
- Step adjustment function (WB / EV / MF / UI Color)
- Preset registration function (WB / MF / UI Color)
- Fixed issue that prevents shooting in the specified format.
- Fixed issue where Remote Shutter does not work in iOS 13
Starting with v 2.0, shooting mode and MWB/MF value are saved when the app is closed. The camera will start in the same shooting mode the next time, and the value will be restored in the case of MWB (manual white balance). MF (Manual Focus) values are also restored.
I also enhanced the functions around the slider such as step adjustment and preset registration.
Note that the behavior of the Rotation Lock has also changed.
How To Use
*Before use, please take a look at mScopePal Privacy Policy.
A. White Balance
Auto (AWB) and Manual (MWB) modes are available.
In MWB mode, you can adjust the white balance using the slider and coordinates.
In addition to normal operation, step adjustment and preset registration are available for the Temp (Temperature) and Tint sliders.
The coordinates display WB with Temperture on the horizontal axis and Tint on the vertical axis.
In MWB mode, you can control WB intuitively with one finger. Drag the circle-pointer on the intersection.
3. Gray Lock
Reduce color casts with Gray Lock feature.
Put the subject outside of view in bright-field illumination, and press the Gray button.
(AWB will be switched to MWB)
It is better to re-adjust each time you change the objective lens.
B: Exposure
Auto / Custom modes are available.
EV (exposure compensation)
Use it anytime to adjust exposure.
Long-press to return to the default value (EV:0).
Duration, ISO
Duration (Exposure Time) and ISO can be used in Custom exposure mode.
Lower ISO and longer exposure time might be useful especially for shooting still photos in darkfield illumination.
(be careful, long exposure time prevents devices from responding quickly, not suitable for videos)
C: Focus / Settings
1. MF
Dafault: 1.0 (the farthest).
In addition to normal operation, step adjustment and preset registration are available.
2. UI Color
Dafault: 0.9 (Deep Pink).
In addition to normal operation, step adjustment and preset registration are available.
3. Rotation Lock (Some changes)
With this feature, you can use Landscape UI and mirror to external display in Landscape even when the device is in Portrait (and vice versa).
*If you do not use this function, you can disable it by turning the switch OFF.
Turn the device to the position you want to lock and double-tap the screen without displaying a settings screen (Has confirmation dialog). When the lock is activated, the lock icon appears next to the [+] icon.
To unlock it, return the device to its locked orientation and double-tap (there is no confirmation dialog).
Lock will be cleared automatically after 30 seconds after closing the app.
*Notice: You cannot Rotation-Lock the device when it's flat. Be sure that the device is in Portrait or Landscape.
You cannot cancel Rotation Lock unless the device is in the Rotation-Locked orientation (to prevent malfunction).
*Image Orientation While the Device Is Rotation-Locked: By default, images are saved according to the device orientation. But you can save images in the locked orientation if necessary.
Please check "Apply to Saved Image Orientation".
3. Formats
Dafault: HEIF/HEVC (equivalent of iOS Camera's "High Efficiency")
Shown on devices compatible with HEIF/HEVC Formats.
If you need "Most Compatible" formats, choose JPEG/H.264.
*About file names: The file name of the photo will be "IMG_xxxx.HEIC(.JPG)" like the standard camera app. For movies, the format is year(2 Digits)+month+day_hours.minutes.seconds.MOV (like "181209_13.25.08.MOV").
new!Step adjustment function
For some sliders, you can increase or decrease the value by a fixed step width by placing your finger over the bar area and flicking it up or down.
The available sliders and step widths are as follows:
- Temp: 100
- Tint: 5
- EV: 0.25
- MF: 0.1
- UI Color: 0.1
new!Preset registration / recall functions
For some sliders, you can store one value (Preset) that you want to recall later.
Long-Press on the right-side-label of the slider registers the current value, and Long-Press on the left-side-label recalls the value.
(A confirmation dialog will appear for both operation)
Available sliders:
- Temp
- Tint
- MF
- UI Color
D. Main / Sub Shutter
In Movie mode, the sub shutter for taking pictures is displayed in addition to the main shutter.
E. Shooting Mode
Tap to change shooting mode. The still camera icon appears in Photo mode and the movie camera icon appears in Movie mode.
Zooming
Pinch-to-zoom is supported. You can expand the image to the maximum magnification of the device.
Remote Shutter
You can operate the main shutter with the center button of the earphone.
*It has been tested with Apple earphones. Third-party products may not function.
*Unlike the standard iOS camera, you can't use the volume button.